Month: September 2016

What is Encryption? and how can it help to better secure your data against theft and loss.

What is Encryption? and how can it help to better secure your data against theft and loss.

The purpose of this article is to introduce you to the concept of Encryption and how it can be used to better secure your data in the event that it is lost or ends up in the wrong hands.

What is Encryption?

Encryption is the term for the process of encoding information in a way that only those authorised to access it, can read it. Encryption is the most effective way of securing your data.

How does Encryption Work?

Basically, Encryption works by scrambling the original information with a very long digital key or password. For anyone without this key, the information appears as gobbledygook and is inaccessible. Those who authenticate with the key or password can unlock the information and view it as intended.

What can I encrypt?

Pretty much anything, including:

• Removable Media

• Single Folders and Files

• Entire Hard Drives

• Emails

• Mobiles Devices

Why should I Encrypt?

The main reason to encrypt your data, is to protect it in the event of it ending up in the hands of someone who is not authorised to look at it. The amount of information that is stored on our laptops and mobile phones is phenomenal. Most users have their entire digital lives on a single device and they may have a range of information stored on them, including; their bank details, Facebook logins, family photos, website logins and more. If someone else had access to this, the damage that can be done could be life changing.

But I have a password on my device?

A lot of you are probably thinking now that you have a password on your device that will stop people from accessing your information. Although it is correct that having a password does make your device more secure from most of the population, it can be very easily reset or removed by someone who knows what they are doing. Encryption on the other hand could take years or decades to be broken if the right password is used.

What should I Encrypt?

From a security perspective you should encrypt as much as possible, both for businesses and individuals. However, this isn’t often feasible; so to answer that question more realistically…it would be best to encrypt:

– ANY information, that if in the wrong hands, could damage you, your business, your staff, your clients or anyone!

Example:

A lot of companies have staff who take their laptops or devices out of the office. In this example the staff member is a Salesman and he’s left his laptop on an exhibition stand. It gets stolen! To a lot of us the financial loss and inconvenience of a laptop being stolen is bad enough. Now imagine that the laptop got into the wrong hands, maybe even a competitor and that they were able to access the information on it (Quotes, financial figures, client information – Whatever). This could, if delivered into the right hands, cause a massive issue for your company. Your company could even face legal action, a damaged reputation or even the loss of a client. The ramifications could be far-reaching.

However, say the salesman had encrypted his laptop. Yes, it would still be a bad day with the loss of the laptop but the likelihood of someone being able to access the information is greatly reduced.

Thank you for reading if you’re interested, some of my other Articles featuring Encryption can be found here:
Encryption Articles

How to reset a forgotten local admin password in Windows

How to reset a forgotten local admin password in Windows

Problem:

Unable to access a local admin account in a Windows.

Resolution:

Reset the user password via cmd.exe – Using a Windows media boot CD

Gaining access to cmd.exe:

1) Boot from the Windows media DVD

2) Select Repair Your Computer (options are slightly different in each version of windows) to get access to command prompt

3) Run the following commands to replace utilman.exe with cmd.exe

>>>>WINDOWS VISTA/7/8/10

copy c:\windows\system32\utilman.exe c:\windows\system32\utilman-old.exe

(This will make a backup of utilman.exe)

copy c:\windows\system32\cmd.exe c:\windows\system32\utilman.exe

(This will replace utilman.exe with cmd.exe)

>>>>WINDOWS XP

copy c:\windows\system32\sethc.exe c:\windows\system32\sethc-old.exe

(This will make a backup of sethc.exe)

copy c:\windows\system32\cmd.exe c:\windows\system32\sethc.exe

(This will replace the sticky keys exe with cmd.exe)

4) Reboot the computer

Resetting the user password:

1) When reaching the login screen, press the shift key 5 times (windows XP) or click the Ease of access button in the bottom left (Windows Vista/7). This will then open cmd.exe

2) Type the following command to reset the users password

net user username newpassword

Replace the ‘username’ with the administrators username and ‘newpassword’ with your desired password.

3) Close CMD and login with your new password.

Done

Once you are able to login, remember to reboot the PC and re-instate the original files:

>>>>WINDOWS VISTA/7/8/10

copy c:\windows\system32\utilman-old.exe c:\windows\system32\utilman.exe

(This will make copy the original exe to the right location)

>>>>WINDOWS XP

copy c:\windows\system32\sethc-old.exe c:\windows\system32\sethc.exe

(This will make copy the original exe to the right location)

Microsoft-Windows-Backup 2155348129 Error on SBS2011

Microsoft-Windows-Backup 2155348129 Error on SBS2011

Problem:
The Windows Server Backup fails with error 2155348129 on SBS2011.

Application Error ID 70:

Log Name: Application
Source: Microsoft-SharePoint Products-SharePoint Foundation Search
Event ID: 70
Task Category: Gatherer
Level: Error
User: DOMAIN\spsearch
Computer: SERVER.DOMAIN.local
Description:
The mount operation for the gatherer application 37ad8233-57f1-47b1-873e-6a91d0f1bc36 has failed because the schema version of the search administration database is less than the minimum backwards compatibility schema version supported for this gatherer application. The database might not have been upgraded.
Log Name: Application
Source: Microsoft-Windows-Backup
Event ID: 521
Level: Error
User: SYSTEM
Description:
The backup operation that started at ‘?2011?-?07?-?06T02:12:07.198000000Z’ has failed because the Volume Shadow Copy Service operation to create a shadow copy of the volumes being backed up failed with following error code ‘2155348129’. Please review the event details for a solution, and then rerun the backup operation once the issue is resolved.

Cause:
In SBS 2011 the above issue is normally caused due to a MS SharePoint update that has not been completed. Patching SharePoint Foundation 2010 in SBS2011 is a two-step process. The updated binaries are installed automatically but PSCONFIG must be run manually in order to update the Sharepoint databases.

Resolution:

Check to see if the Sharepoint databases requires an update:

• Launch an elevated SharePoint 2010 Management Shell –

Click Start> All Programs> Microsoft SharePoint 2010 Products> Right click SharePoint 2010 Management Shell and select Run as Administrator.

• Once the shell opens, type the following command followed by enter:

(get-spserver $env:computername).NeedsUpgrade

get-server

If the result of this command is True, then you need to complete the following steps in order to update the database. If the result is False then the below probably won’t resolved the issue.

1. Launch an elevated SharePoint 2010 Management Shell –

Click Start> All Programs> Microsoft SharePoint 2010 Products> Right click SharePoint 2010 Management Shell and select Run as Administrator.

2. Type the following followed by enter:

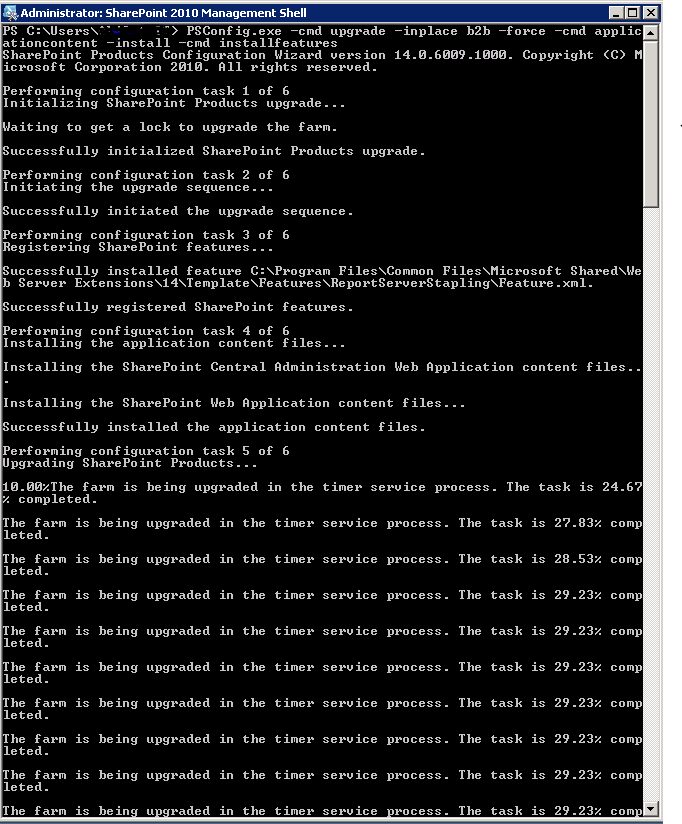
PSConfig.exe -cmd upgrade -inplace b2b -force -cmd applicationcontent -install -cmd installfeatures

Note: The Companyweb site will be inaccessible while the command is running. It is best to run the command after business hours. The amount of time the command takes to run will vary on the size of the database and the speed of the server. On a reference machine with 8 logical processors, 32GB of RAM and a 2GB content database, the command took approximately 5 minutes to execute.

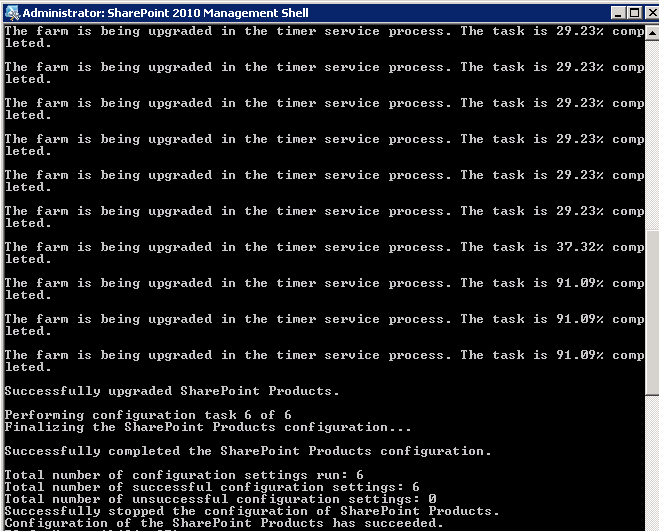
Results:

psconfig-1
psconfig-2

The credit and the original post for this problem can be found here:
https://social.technet.microsoft.com/Forums/en-US/94c5f178-f020-4d0f-ba7c-11c415d0d862/manually-running-psconfig-is-required-after-installing-sharepoint-foundation-2010-updates?forum=smallbusinessserver

For more of my Articles on Windows Small Business Server, please see here:

SBS Articles

Free up disk space in SBS2008 / SBS2011

Free up disk space in SBS2008 / SBS2011

I’ve written the below article as an overview on how to Free up disk space in SBS2008 and SBS2011.

Reclaiming Disk Space in SBS 2008 / SBS 2011.

The IIS Logs:

IIS logs in SBS 2008/2011 can grow pretty big. Check the following folder and sub directories:
C:\inetpub\logs\LogFiles

Delete the *.log files but do NOT delete the actual folders:

Top TIP:
Unless there is no other option, leave the last one month of logs so that they can be reviewed if ever required. They can always be moved to another volume if you don’t won’t to delete them.

The Windows Small Business Server logs folder:

Windows SBS generates a number of log files when utilising the SBS Console. These logs can become very large over time.

The SBS Log files can be found here:
C:\Program Files\Windows Small Business Server\Logs\

These logs can be moved or deleted if required to free up additional disk space. I’d always suggest moving a log file opposed to deleting it.

Console.log –
Console.log can become particularly big in some instances if you use the SBS Console. This log will continue to grow while the SBS Console is running and as you use the SBS wizards. The Windows SBS Manager service will need to be stopped in order to delete this log. The SBS Console will also need to be closed. Once the log has been moved/deleted, remember to restart the Windows SBS Manager Service.

Top TIP:
When using the SBS Console, make sure that it is closed afterwards. The console.exe process can sap server resources.

*.evtx files –
These are the event logs before the setup of the server completed, they can be safely removed if the server has been in production and had no setup issues.

W3wp.log –
Located in the C:\Program Files\Windows Small Business Server\Logs\WebWorkplace folder. This is the log for Remote Web Workplace (RWA).

MonitoringServiceLogs –
The C:\Program Files\Windows Small Business Server\Logs\MonitoringServiceLogs folder.
These are the logs for the Windows SBS Manager service. As such the service will need to be stopped prior to the logs deletion.

POP Connector Logs –
The POP3 connector log located in C:\Program Files\Windows Small Business Server\Logs\POP3Connector monitors the POP3 Service and keeps a log of the connections made to the POP Server. This log is typically only large if the POP Connector is being used. You will need to stop the Windows SBS POP3 Connector Service in order to delete these logs.

POP Connector Badmail –
If you the POP3 Connector is being used, you may end up with emails that failed to be delivered (rejected by the local Exchange server) in C:\Program Files\Windows Small Business Server\Data\badmail.

WSUS Cleanup Wizard:

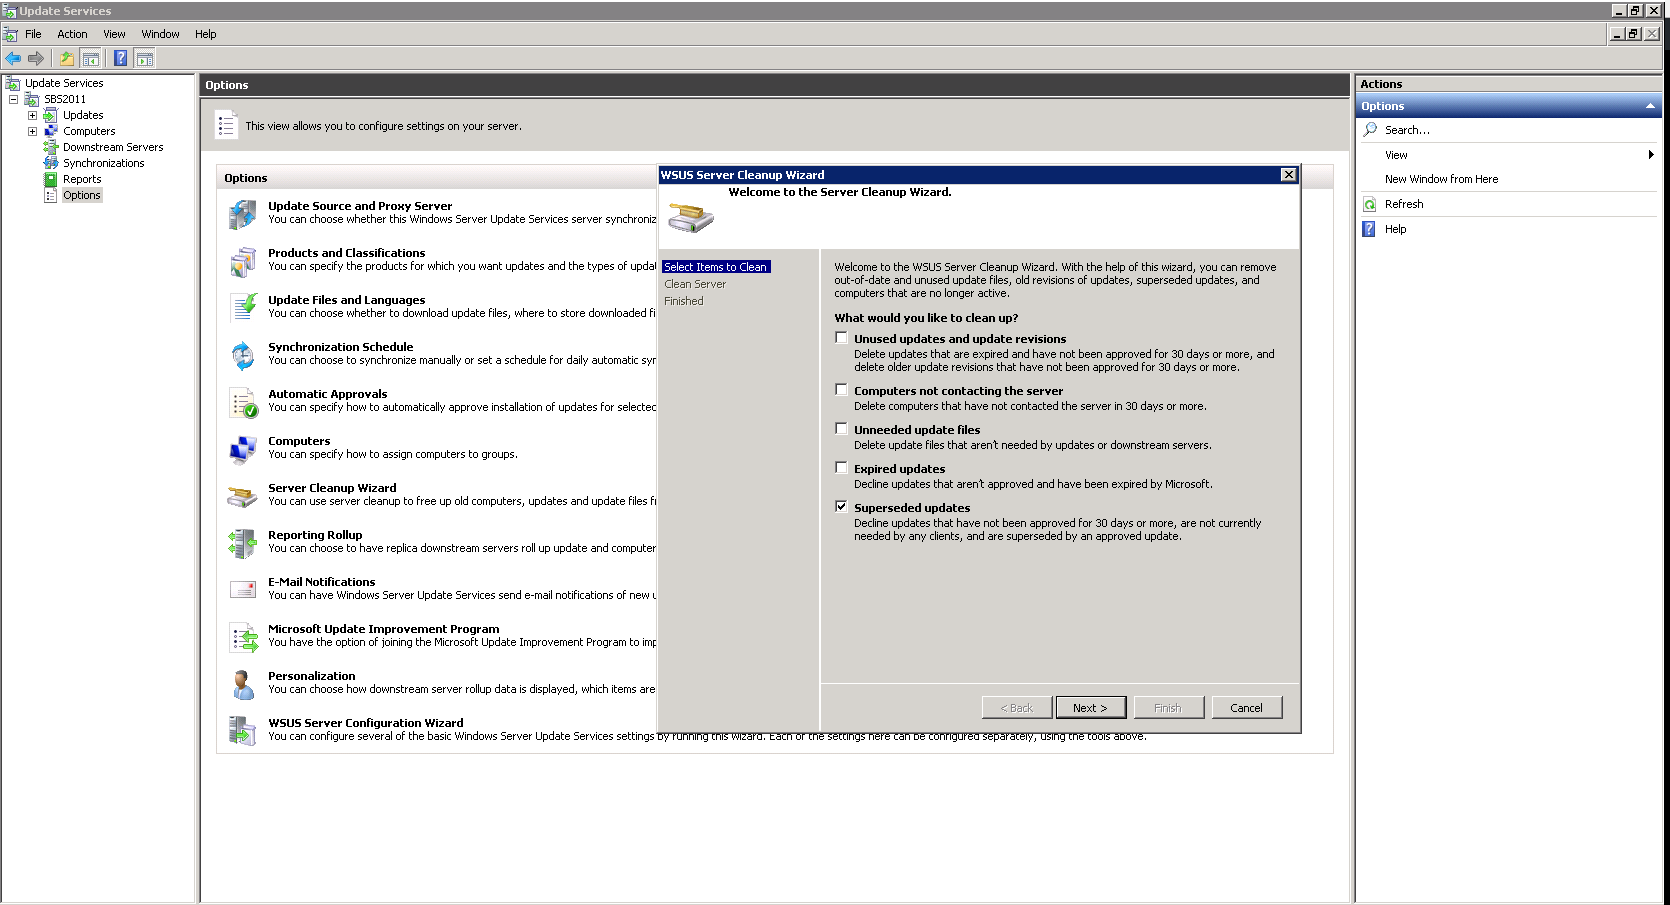
Windows SBS 2008/2011 comes with Windows Server Update Services (WSUS) pre-installed. The database and content for this feature can grow massively over time. To help reduce this space, you can run the WSUS Cleanup Wizard:

To run the Server Cleanup Wizard :

1. Click Start>Administrative Tools> Windows Server Update Services

2. The WSUS Administration Console will open > Expand the server name> Select Options, and then Server Cleanup Wizard.

3. Select one option at a time and click next.

WSUS2

4. The wizard will begin the cleanup process and will present a summary when it has completed. Click Finish to complete the process.

5. Repeat steps 2-4 until you’ve gone through all the cleaned up options.

Note:
If the cleanup wizard has not been run in a while (or ever) it can take several attempts for the wizard to succeed. The wizard can crash so don’t be alarmed if you’re given an error. If the wizard crashes and you’re unable to open the WSUS Console then restart the following services and try again:

Windows Update / Windows Internal Database.

The SBS Move Data Wizards:

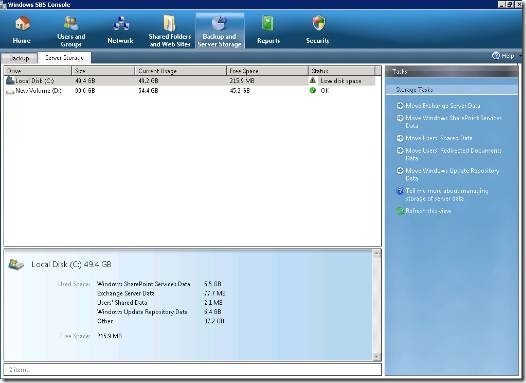
The SBS Console comes with a number of Wizards that allows the admin to move certain files and folders to other partitions. It is suggested that a good backup always be taken prior to the wizards being run. The Wizards can be accessed from the SBS Console> Backup and Server Storage> Server Storage. See the wizards on the right hand side.

– Move Exchange Server Data:
This moves both the exchange database file as well as your exchange transaction logs for all storage groups.

– Move Windows SharePoint Services Data:
This moves the SharePoint Content and Configuration databases.

– Move Users’ Shared Data:
This moves C:\Users\Shares\ directory and all sub directories

– Move Users’ Redirected Documents Data:
This moves C:\Users\FolderRedirections\ directory and all sub directories

– Move Windows Update Repository Data:
This moves the Windows Update repository data from C:\WSUS\WSUSContent and C:\WSUS\UpdateServicePackages. Please note it does NOT move the actual WSUS Database (SUSDB).

Move Wizards location:
Move-Data

Moving the WSUS Database:

The Windows Server Update Services Database can be relocated by doing the below. Again a good backup is recommended prior to proceeding:

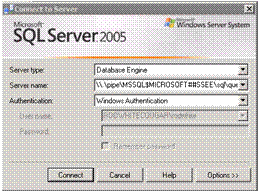
– Launch SQL Server Management Studio Express console as an administrator. It is located under Start > Programs >Microsoft SQL Server 2008 R2 > SQL Server Management Studio Express.

– Fill in the following information and then click Connect

– Server type: Database Engine

– Servername: \\.\pipe\MSSQL$MICROSOFT##SSEE\sql\query

– Authentication: Windows Authentication

Auth1

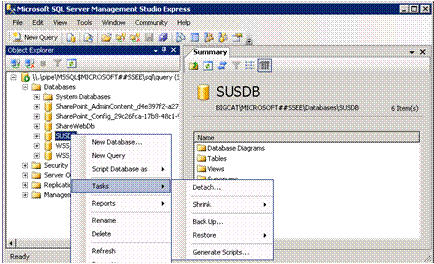
– Expand Databases and right-click on SUSDB and select Tasks > Detach… from the context menu.

Auth2

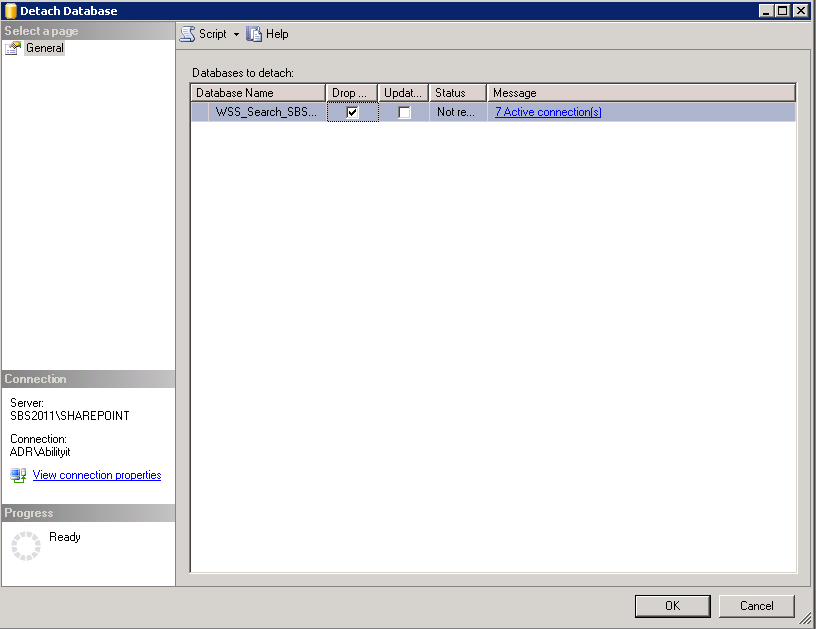
– Select the “Drop Connection” checkbox and click OK.

DropDB

– Open Windows explorer and COPY the C:\WSUS\SUSDB folder to the new location on another partition.

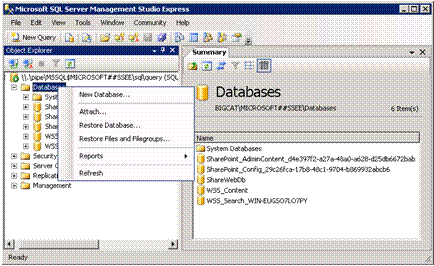
– To reattach the database, right-click on Database and select Attach… from the context menu.

Auth4

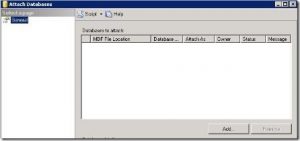
– On the Attach Databases page select the Add button.

Auth5

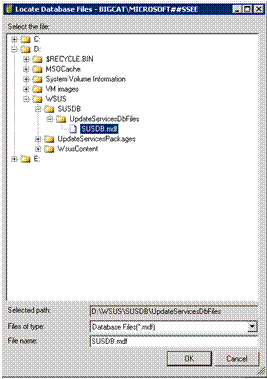
– Browse to the new location of the SUSDB.mdf database and select OK twice to complete the move

Auth6

– Delete the old Database folder once you’re happy that it is working correctly.

Still running low on disk space?

Download and install TreeSize Free (http://www.jam-software.com/freeware/)
Run a scan on the drive and it will display all the folders on that drive as well as their file sizes. You can then see where the largest folders are and determine what else is taking up space.

Unable to set up Office 365 integration on Windows Server 2012 R2 Essentials

Unable to set up Office 365 integration on Windows Server 2012 R2 Essentials

I’ve previously came across a problem with integrating the Windows Server Essentials 2012 Dashboard with Office 365. I’m posting the problem and solution here as it has helped some other users on a few forums.

Problem:

When running the Office 365 integration wizard in the Windows Server 2012 R2 Essentials dashboard the wizard runs for a very long time, and returns the following error:

“An unknown error occurred. Make sure that the computer is connected to the internet, and the try again. If you continue to to experience, restart the server and then try again”

My Solution:

After checking through the log files (C:\ProgramData\Microsoft\Windows Server\Logs\SharedServiceHost-EmailProviderServiceConfig.log) I found the following:

Microsoft.WindowsServerSolutions.O365Integration.O365ConfigureException: The remote server returned an error: (404) Not Found. —> System.Net.WebException: The remote server returned an error: (404) Not Found.
at System.Net.WebClient.DownloadFile(Uri address, String fileName)
at Microsoft.WindowsServerSolutions.O365Integration.SharePointManagementUtils.InstallCSOM()

I resolved the error by installing the ‘SharePoint Server 2013 Client Components SDK‘ which contains the CSOM modules. See here:

http://www.microsoft.com/en-gb/download/details.aspx?id=35585

Once this had been installed the Integration wizard worked correctly.

Hope that this helps.