Category: Windows10

Error could not find this item. This is no longer located in – Verify the item’s location and try again

Error could not find this item. This is no longer located in – Verify the item’s location and try again

Problem:

When trying to delete a phantom file, you get an error stating that Windows “could not find this item. This is no longer located in [PATH], Verify the item’s location and try again”

In my case the file had already been deleted via Windows Explorer but it was still showing. The file was stored on a server share and didn’t have a file extension and could not be opened, edited, renamed or deleted.

Initially I attempted to delete the file with Windows Explorer, Powershell (Remove-Item) or cmd (del). This was attempted both as the local user and a secondary Administrator user.

The Resolution:

I was eventually able to resolve the problem using an elevated command prompt and specify the files shortname in with the del command. Instructions below:

Open Command Prompt as Administrator

Navigate to the folder which contains the phantom file by trying the following command:
cd C:\FolderPath

Do a directory listing which shows the short names:
dir /x

Find the phantom file and use the short name to delete the file, for me this was ‘FILE~’ :
del FILE~


The above successfully managed to delete the phantom file.

Sage Antivirus Exclusions – Powershell Script for Windows Defender

Sage Antivirus Exclusions – Powershell Script for Windows Defender

Sage Company Logo

What does this Powershell Script do?

This is a simple Powershell Script to automate the process of adding Exclusions for Sage Accounts into Windows Defender

It will carry out the File and Folder exclusions listed in the following Sage Article:
https://my.sage.co.uk/public/help/askarticle.aspx?articleid=12122

It Will NOT add the URL Exclusions.

The Script has been tested on the following Operating Systems:

Windows 10 32-Bit
Windows 10 64-Bit

The Script:

Download: Sage-Exclusions-Windows-Defender

Remember to run the Script as an Administrator.


Write-Host "Adding Sage Anti-Virus Exclusions" -ForegroundColor Green
Write-Host "Excluding Data Files Extensions" -ForegroundColor Yellow
Add-MpPreference -ExclusionExtension DTA, DTH, COA, S50
Write-Host "Excluding Report and Layout File Extensions" -ForegroundColor Yellow
Add-MpPreference -ExclusionExtension SRT, SLY, SLT, SLB, RPT
Write-Host "Excluding Sage Account File Extensions" -ForegroundColor Yellow
Add-MpPreference -ExclusionExtension report, layout, letter, label
Write-Host "Excluding Memo Files" -ForegroundColor Yellow
Add-MpPreference -ExclusionExtension SLM, PLM, NLM, ILM, BLM, CLM, DLM
Write-Host "Excluding Critera Files" -ForegroundColor Yellow
Add-MpPreference -ExclusionExtension SLC, SLI, PRC, PRO, NMC, NMI, BKC, BKI, SKI, IVC, IVI, SPC, SPI, PCC, PPI, PCI, REC, REI, SAC, SAI, IPC, IPI, PDC, PDI
Write-Host "Excluding Folders used by Sage Accounts (32-Bit and 64-Bit)" -ForegroundColor Yellow
Add-MpPreference -ExclusionPath "C:\Program Files\Common Files\Sage SBD"
Add-MpPreference -ExclusionPath "C:\Program Files (x86)\Common Files\Sage SBD"
Add-MpPreference -ExclusionPath "C:\Program Files\Common Files\Sage Line50"
Add-MpPreference -ExclusionPath "C:\Program Files (x86)\Common Files\Sage Line50"
Add-MpPreference -ExclusionPath "C:\Program Files\Common Files\Sage Report Designer 2007"
Add-MpPreference -ExclusionPath "C:\Program Files (x86)\Common Files\Sage Report Designer 2007"
Add-MpPreference -ExclusionPath "C:\Program Files\Common Files\Sage Shared"
Add-MpPreference -ExclusionPath "C:\Program Files (x86)\Common Files\Sage Shared"
Add-MpPreference -ExclusionPath "C:\Program Files\Sage EBanking"
Add-MpPreference -ExclusionPath "C:\Program Files (x86)\Sage EBanking"
Add-MpPreference -ExclusionPath "C:\Program Files\Sage"
Add-MpPreference -ExclusionPath "C:\Program Files (x86)\Sage"
Add-MpPreference -ExclusionPath "C:\ProgramData\Sage"
Write-Host "Script Complete" -ForegroundColor Green

For large organisations using Sage it is suggested that you configure the exclusions either via your Anti-Virus Management Console or via GPO.

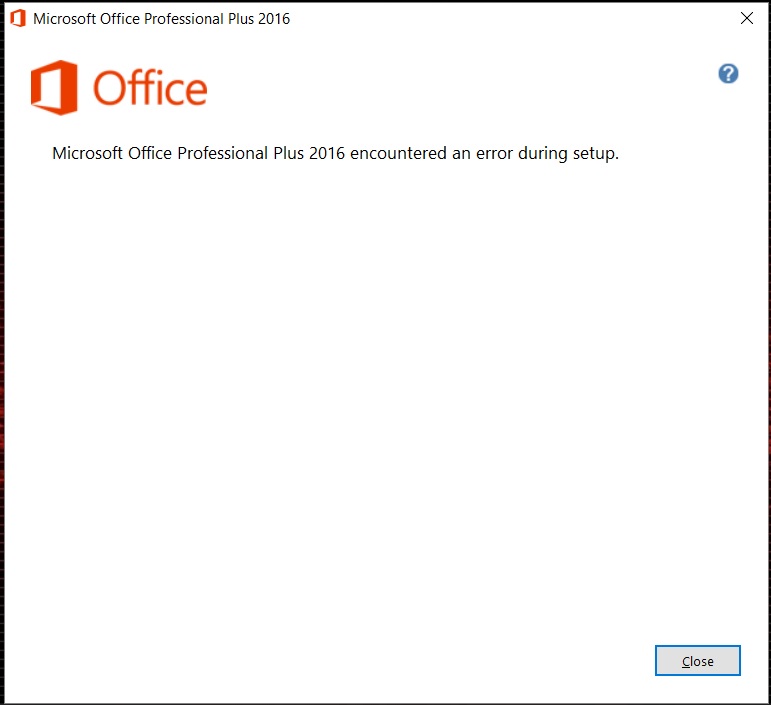
Microsoft Office Professional 2016 encountered an error during setup

Microsoft Office Professional 2016 encountered an error during setup

Problem:

I recently has an issue when trying to install Microsoft Office Professional 2016 (Volume Licence) onto a new Windows 10 machine. The setup.exe would fail with the below error:

Microsoft Office Professional 2016 encountered an error during setup
Microsoft Office Professional 2016 encountered an error during setup.

Troubleshooting:

I checked the Office Setup logs located in the following directory C:\Users\USER\AppData\Local\Temp and found the following errors:

Error: Failed to install product: C:\MSOCache\All Users\{90160000-0116-0409-1000-0000000FF1CE}-C\Office64MUI.msi ErrorCode: 1603(0x643)
Error attaching to OSE, error 0x00000000

After some googling I found this Microsoft Community question relating to my problem:

https://answers.microsoft.com/en-us/msoffice/forum/msoffice_install-mso_win10/microsoft-office-2016-encountered-an-error-during/594e99a2-7751-4a9d-bfe3-c4db9b051eb2

Solution:

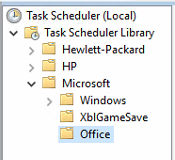
The error was actually being caused due to a folder in Task Schedule called ‘Office’. The folder was empty and being detected by the setup.exe on installation which is why the install was failing.

I deleted the empty folder in task scheduler and re-ran the setup which resolved the problem and installed correctly.

Task Scheduler -Office

[amazon_link asins=’B01EZU2RLA,B01HI36TYM,B007UXIE7Q’ template=’ProductGrid’ store=’412294wp-21′ marketplace=’UK’ link_id=’e56656fd-578b-11e8-be38-3bf0d89fb6e5′]

Avoid getting infected by threats like ‘WannaCry/WCry’ – Ransomware

Avoid getting infected by threats like ‘WannaCry/WCry’ – Ransomware

I’ve been asked about the WannaCry Ransomware a few times over the last few days. My top tips on how to avoid becoming a victim to these kinds of threats are below:

Keep your Systems up-to-date.

Windows updates can be irritating. We’ve all been there when we’re ready to go home and we’re waiting for Windows update to finish installing before the PC is shutdown. However, in the case of ‘WannaCry’ ransomware, the infections could have been avoided by the Microsoft Fix being installed. The Fix itself was released months ago, with Microsoft Updates turned on there is a vastly reduced chance of you getting this kind of infection that tried to access your machine via known Vulnerabilities in Microsofts software.

Use a supported Operating System.

The support for older versions of Microsofts Operating Systems like Windows XP ended ages ago. Microsoft were under no obligation to release a fix for the SMB issue that the ‘WannaCry’ infection exploited. Users on the latest Windows 10 operating System were immune to this issue as the auto updates would have patched the vulnerability when it was released. Refer back to item number 1.

Get yourself a decent Anti-Virus.

There are far too many people out there who run their Systems with either no Anti-Virus or a poor performing free Anti-Virus. With a paid Anti-Virus you’re in safer hands.

Personally, I recommend ESET Anti-Virus. I’ve used it for many years and have it on both my Home and Work Operating Systems. It’s low on Resource consummation and has an excellent virus detection rate. Those users who already have ESET will have been immune to the ‘WannaCry’ infection as ESET can detect and stop it. The same is said for many of the other varients of Ransomware

A Link is for ESET can be found at the bottom of this page.

Email – Be cautious, if in doubt don’t open them.

Email is possibly the biggest method in which machines are infected with viruses and malware. This means that if the users are more cautious and aware then there is less risk of being infected. Scammers are getting very smart in their methods of making an email look like it has come from a legitimate source when it hasn’t. I strongly suggest that you take care when going through your emails. If you don’t think the sender is legitimate then check with them before opening it. If you can’t contact them directly, delete the email. Better safe than sorry.

Going even further than this, if you’re a company you should have some kind of Email Filtering in place. Yes, it does cost a little bit of money but probably nothing in comparison to getting an infection and losing your data!

If it’s important to you – Have a BACKUP!

Despite having all of the above in place, there is still a chance of being infected by something that you can’t remove without having to reinstall you PC. In the event of this, it’s always best to have a backup! Anything that you have that you cannot do without you’ll want to backup. Backup to multiple locations and backup often.


728x90 ESET for Windows, 30 Days Free

Unable to update Windows 10 with DESlock+ Full Disk Encryption (FDE) enabled

Unable to update Windows 10 with DESlock+ Full Disk Encryption (FDE) enabled

Problem:

Unable to install the latest build of Windows 10 when DESlock+ Full Disk Encryption (FDE) is enabled on the System Disk.

When installing it brings up an error stating:
Disable encryption to continue or run windows setup with the /reflectdrivers command-line option

Background:

As Security is a big portion of what I do, I have both my Work and Home Windows 10 machines Encrypted with FDE. Its definitely overkill for my home PC but it serves a purpose on my work machine. I can sleep happily knowing that if the machine is ever stolen – They’re not getting to my data. It’s probably also worth mentioning that I recommend having FDE in place for businesses.

Resolution:

I used the following article to get round it:
https://support.deslock.com/index.php?/Default/Knowledgebase/Article/View/379

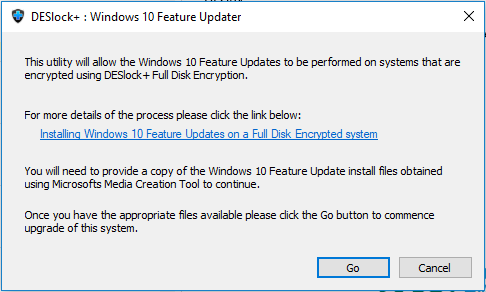
You need to Download the Media Creation tool, save an ISO and then install the DESlock+Win10Update utility:
https://support.deslock.com/resources/KB379/DESlock+Win10Updater.exe
DESlock+ Win10Update utility
When the Utility Runs, you need to point it at the mounted Win10 ISO. It will then complete the upgrade as normal.

Windows 10 – Windows Explorer not responding when creating or renaming a folder on a Server 2012 Essentials R2 network share

Windows 10 – Windows Explorer not responding when creating or renaming a folder on a Server 2012 Essentials R2 network share

Problem:

I recently had an issue with a Windows 10 PC. Windows Explorer stops responding when creating or renaming a folder on a Server 2012 Essentials R2 network share.

Client Spec:
Windows 10 64-Bit
Version 1607
Build 14393.351
4GB RAM
i5 Processor

Issue explained:

When the user tries to create or rename a folder on a network share (UNC Path/Mapped Drive or IP Address), Windows explorer stops responding for about 30-60 seconds. Eventually the folder does get created or renamed. Viewing this from the server shows the old folder name until about 30-60 seconds later. No error is displayed client end other than the not responding of Windows Explorer.

Resolution:

For me the only resolution for this issue was to stop and disable the ‘Windows Search’ service on the server. As soon as the service is disabled the folders can be created and renamed without delay. Restarting the service caused the problem to come back immediately.

As far as I am aware, Microsoft has yet to create a patch for this issue.

How to reset a forgotten local admin password in Windows

How to reset a forgotten local admin password in Windows

Problem:

Unable to access a local admin account in a Windows.

Resolution:

Reset the user password via cmd.exe – Using a Windows media boot CD

Gaining access to cmd.exe:

1) Boot from the Windows media DVD

2) Select Repair Your Computer (options are slightly different in each version of windows) to get access to command prompt

3) Run the following commands to replace utilman.exe with cmd.exe

>>>>WINDOWS VISTA/7/8/10

copy c:\windows\system32\utilman.exe c:\windows\system32\utilman-old.exe

(This will make a backup of utilman.exe)

copy c:\windows\system32\cmd.exe c:\windows\system32\utilman.exe

(This will replace utilman.exe with cmd.exe)

>>>>WINDOWS XP

copy c:\windows\system32\sethc.exe c:\windows\system32\sethc-old.exe

(This will make a backup of sethc.exe)

copy c:\windows\system32\cmd.exe c:\windows\system32\sethc.exe

(This will replace the sticky keys exe with cmd.exe)

4) Reboot the computer

Resetting the user password:

1) When reaching the login screen, press the shift key 5 times (windows XP) or click the Ease of access button in the bottom left (Windows Vista/7). This will then open cmd.exe

2) Type the following command to reset the users password

net user username newpassword

Replace the ‘username’ with the administrators username and ‘newpassword’ with your desired password.

3) Close CMD and login with your new password.

Done

Once you are able to login, remember to reboot the PC and re-instate the original files:

>>>>WINDOWS VISTA/7/8/10

copy c:\windows\system32\utilman-old.exe c:\windows\system32\utilman.exe

(This will make copy the original exe to the right location)

>>>>WINDOWS XP

copy c:\windows\system32\sethc-old.exe c:\windows\system32\sethc.exe

(This will make copy the original exe to the right location)