Category: Exchange 2010

How To Add a New Domain into a Sonicwall Email Security Appliance (Inbound)

How To Add a New Domain into a Sonicwall Email Security Appliance (Inbound)

Situation:

You have purchased a new Email domain which you would like to receive mail on. You have an existing Sonicwall Email Security Appliance (ESA) in place and you need to configure it to accept the new email domain.

Resolution:

Log into your Sonicwall ESA via the web interface and log in as the ‘admin’ user account. The default username and password for this account is admin/password. Hopefully you will have changed this. If you haven’t, you need to…

Once logged in, carry out the following to get you to the right place:

Expand System>
Expand Network Architecture>
Click on Server Configuration>

In Server Configuration – All in One>
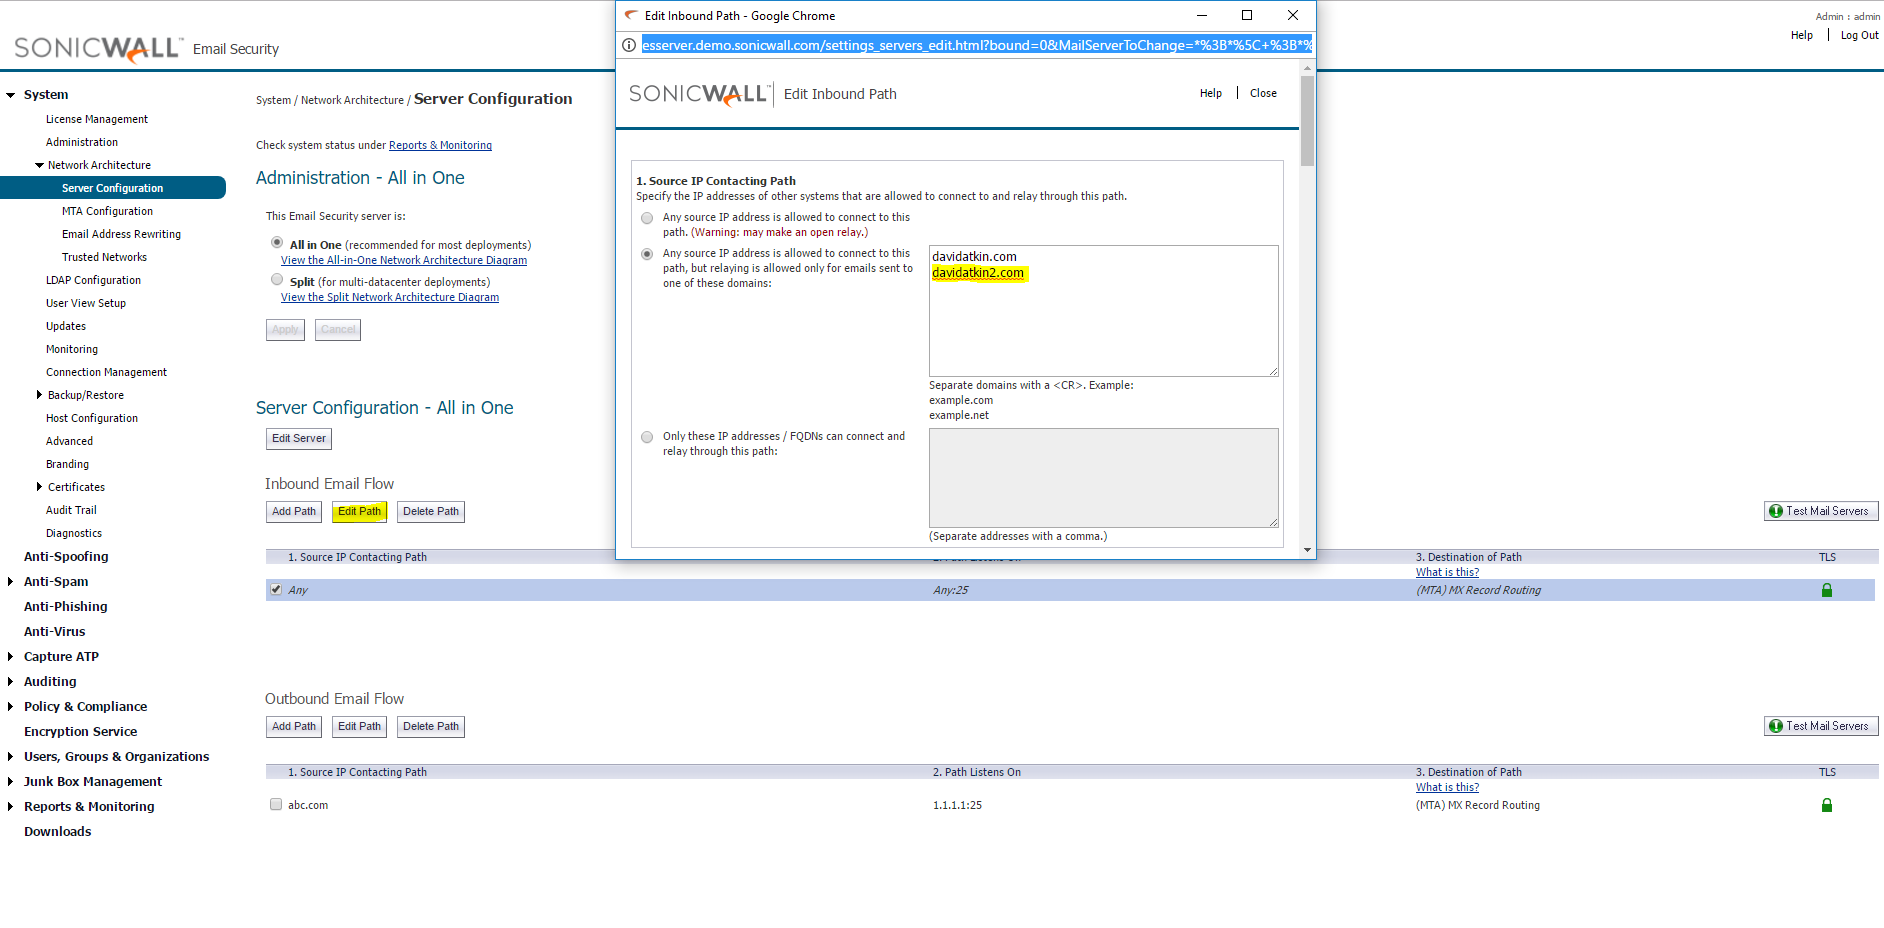
Highlight the inbound Email Flow Path and click ‘Edit Path’>

Add new domain into the list.
Scroll down to the bottom and click Apply

I’ve added a screenshot of this page below. Click on it to expand.
Sonicwall Email Security - Add Domain

Side note:

Remember to configure your Email Server to receive on the new email as well.

Installing an SSL Certificate in Exchange 2007 / 2010 and assigning it to Exchange Services

Installing an SSL Certificate in Exchange 2007 / 2010 and assigning it to Exchange Services

SSL Prerequisite(s):

You will have generated a CSR (Certificate Signing Request), prior to this. For an easy way to generate the EMS CSR Command, see here:

Exchange 2007 EMS CRS Command Generator: Exchange 2007 CSR
Exchange 2010 EMS CRS Command Generator: Exchange 2010 CSR

You will have Installed your Intermediate Certificate (via mmc) prior to the below.

——————————————————————————————–

How to Import the SSL Certificate

From an elevated Exchange Management Shell, run the following command to import the SSL Certificate into Exchange 2007 \ 2010:

Import-ExchangeCertificate -FileData ([Byte[]]$(Get-Content -Path c:\certificates\YOUR_CERTIFICATE.cer -Encoding byte -ReadCount 0))

Note: Replace “c:\certificates\YOUR_CERTIFICATE.cer” with the path of your Certificate location

——————————————————————————————–

To enable the Certificate and assign it to the relevant services, run the following command:

Assign Certificate in Exchange 2007:
Enable-ExchangeCertificate -Thumbprint *Insert Thumbprint* -Services “POP,IMAP,SMTP,IIS”

Note: replace *Insert Thumbprint* with $your_Thumbprint (you will see this in the output of the previous command).

Assign Certificate in Exchange 2010:
Enable-ExchangeCertificate -Thumbprint *Insert Thumbprint* -Services POP,IMAP,SMTP,IIS

Note: replace *Insert Thumbprint* with $your_Thumbprint (you will see this in the output of the previous command).

Original Source:
https://support.comodo.com/index.php?/Knowledgebase/Article/View/712/37/certificate-installation-exchange-2010-powershell

Changing the Default SBS Mailbox Database

Changing the Default SBS Mailbox Database

Sometimes it is more practical to create a new Mailbox Database and move the mailboxes opposed to moving the Database via the SBS Wizard. The problem is, when you’ve done this and deleted the original Database it stops the SBS Console from creating any new mailboxes when creating a user, this is due to it trying to create the mailbox on the old (now removed) mailbox database.

The warnings received in the SBS Console are:
‘Unable to find the default mailbox database. Make sure mailboxes database exists and you have access to view the database’
‘Mailbox does not exist for reciepient of welcome mail.’

How to update the default mailbox database:
– Open the Exchange Powershell as Administrator
– Run the following command to get the mailbox Database name:
‘Get-MailboxDatabase’

The outcome will look a little something like this:Get-MailboxDatabase

– Open the registry (regedit) and browse to: HKEY_LOCAL_MACHINE\SOFTWARE\Microsoft\SmallBusinessServer\Messaging

– Update the String value of MailboxDatabaseName to the name of the new mailbox database name

Link to Microsoft KB:
https://support.microsoft.com/en-us/help/2500559/-add-a-new-user-wizard-fails-to-create-a-user-mailbox-on-windows-small-business-server-2011