In order for this script to work you will need to register on the HP Developer portal and gain access to the HP Warranty API. Once registered you will be given your own HP API Key and Secret. For more information on how to do this, please see here:
The first part of the script will query the local computer or laptop to obtain the Product Number and Serial Number of the PC.
It will then Query the HP Warranty API using your API Key for the following information:
Product Model Warranty Status Warranty Start Date Warranty End Date Warranty Service Level
The Second part of the Script will then email this information to an email address of your choice. You will have to specify your Email Settings within the Script.
Note – This will NOT work for HPE Servers as they have a different HPE API.
Things you will need to edit:
You will need to update the following parts of the Script with your relevant information:
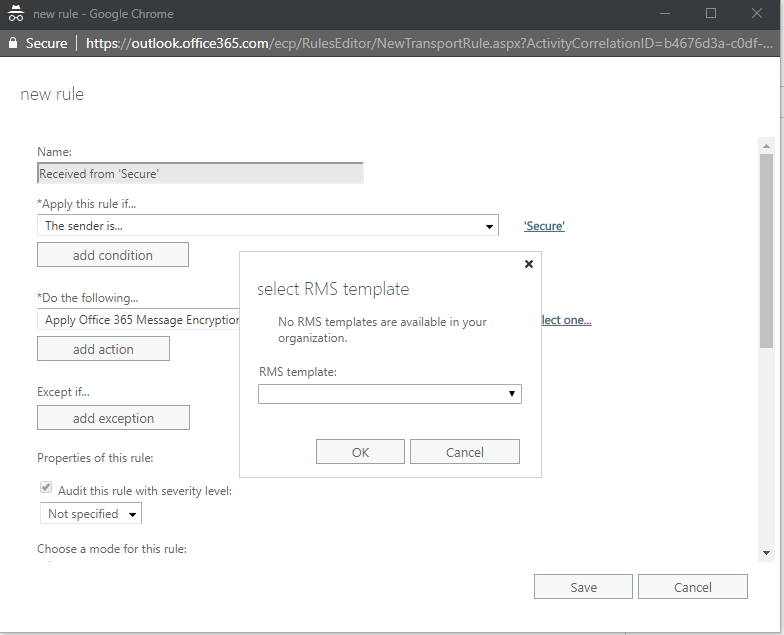
When configuring a transport rule for ‘Apply Office 365 Message Encryption and rights protection to the message with…” you receive the following error when attempting to select a label:
“No RMS templates are available in your organization”
Solution:
You need to configure Exchange Online for RMS. See below for powershell commands:
# Configure the RMS Online Key Sharing Location (Note that this url changes based on location – See the bottom of this article for locations) Set-IRMConfiguration –RMSOnlineKeySharingLocation “https://sp-rms.eu.aadrm.com/TenantManagement/ServicePartner.svc”
# Test the IRM Configuration to ensure that Exchange is configured correctly Test-IRMConfiguration -RMSOnline
The output of this command should look something like this, with the overall result as PASS.
Results : Checking organization context …
– PASS: Organization context checked; running as tenant administrator.
Loading IRM configuration …
– PASS: IRM configuration loaded successfully.
Checking RMS Online tenant prerequisites …
– PASS: RMS Online tenant prerequisites passed.
Checking RMS Online authentication certificate …
– PASS: The RMS Online authentication certificate is valid.
Checking that a Trusted Publishing Domain can be obtained from RMS Online …
– PASS: Trusted Publishing Domain successfully obtained from RMS Online. Templates available:
Confidential \ All Employees, Highly Confidential \ All Employees, Secure Email.
Checking that the Trusted Publishing Domain obtained from RMS Online is valid …
– PASS: Trusted Publishing Domain obtained from RMS Online is valid.
OVERALL RESULT: PASS
# Set the IRM Internal Licencing to True Set-IRMConfiguration -InternalLicensingEnabled $true
Give Exchange Online 20 minutes to see the update and you should then be able to see the Templates.
Global policy issue:
Currently there is a bug with Exchange Online not being able to see labels that are NOT included in the ‘Global’ Azure Information Protection Policy. This is being investigated by Microsoft at the time of writing this article.
RMS Key Sharing Location URLs:
North America
https://sp-rms.na.aadrm.com/TenantManagement/ServicePartner.svc
European Union
https://sp-rms.eu.aadrm.com/TenantManagement/ServicePartner.svc
Asia
https://sp-rms.ap.aadrm.com/TenantManagement/ServicePartner.svc
South America
https://sp-rms.sa.aadrm.com/TenantManagement/ServicePartner.svc
Office 365 for Government (Government Community Cloud)
https://sp-rms.govus.aadrm.com/TenantManagement/ServicePartner.svc
Deletes Sage files in the following locations:
C:\Windows\System32
C:\Windows\SYSWOW64\
Deletes the C:\ProgramData/Sage/Accounts Folder
Important Notes:
1) You must run the script as an Administrator
2) You must ensure that the correct execution policy is enabled on the PC
3) Do NOT use this script on a PC which has other Sage software installed on it (Payroll / ACT / Job Costing etc). If you do, it will likely break them and possibly cause data loss.
4) If the Sage Accounts or Payroll Company Data located on the machine that you MUST take a backup prior to running the script.
5) As per the above, this script removes the Sage Company Data located in C:\ProgramData\Sage\Accounts
6) You may see some error when it’s trying to remove some of the Sage software. This is due to the main Sage uninstaller removing the other installed (I.E. Sage Data Service). Sometimes however the main installer doesn’t work hence leaving this in the script.
7) The script will NOT remove .NET
8) It’s suggested that you read the script before blindly running it
9) I take no liability for any Damage caused from the use of this script. It is supplied as is. I’m not a scripting expert, I’ve just thrown it together. I’m sure there are better ways to do this.
10) Any suggested changes to the script are welcome. Feel free to drop me a comment with your suggestions.
This very simple Powershell script is aimed at MSPs and Microsoft Partners that manage their clients Office365 environments. It will disable the ‘UsersPermissionToUserConsentToAppEnabled’ option within the clients Tenancy so that they are unable to give permission for third party Apps to access their Office365 Accounts.
Why would you want to do this?
It has been suggested that the next large ransomware attack may target cloud environments like Microsoft Office365. One of the ways that this could be accomplished is by end users granting permission for third party apps to access their Office365 accounts. For more information, see the link below.
One of the ways of protecting against this is to disable the end users ability to grant permission to the third party apps in the first place. This is what the script does within Office365.
Things to consider:
– The Script is designed for Office365 Admins who manage a reasonable number of Office365 Tenancies. Using the script will mean that the setting doesn’t need to be applied manually per tenant.
– The Script requires you to be an Office365 Administrator with Delegation permissions over your clients environments
– You may want to check with your clients to make sure that they don’t need this feature.
– The script will presume that you have the correct execution policy configured.
– For those of you with fewer clients you can set this via the Office 365 Admin Center > Settings > Services & Add-ins > Integrated Apps (Refer to picture at the top of the page)
– I take no responsibility or liability for any unforeseen effects of the script. It is suggested that you read through any Powershell script before executing it.
The Script:
#Show Prompt to user

[System.Windows.MessageBox]::Show('This Script will Disable the "UsersPermissionToUserConsentToAppEnabled" option for each Tenant linked to your Partner Account.  Click OK to continue')

#Connect to Office365 Partner Tenancy

$Cred = Get-Credential

Connect-MsolService -Credential $Cred

#Get list of Tennant ID's

$Tenant = Get-MsolPartnerContract

foreach ($ID in $Tenant) {Set-MsolCompanySettings -TenantId $ID.TenantID -UsersPermissionToUserConsentToAppEnabled $False

Get-MsolCompanyInformation -TenantId $ID.TenantId | Select DisplayName, UsersPermissionToUserConsentToAppEnabled}
Below is a simple PowerShell Script to connect to the following Microsoft Online Services:
Office365 Admin Center
Exchange Online
Sharepoint Online
Skype for Business
Security and Compliance Center
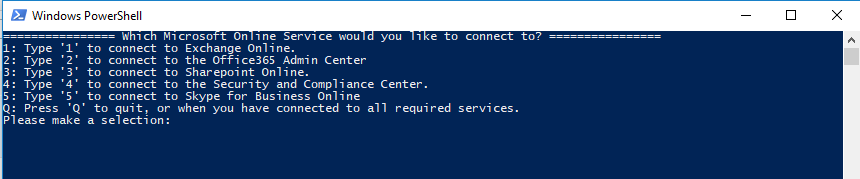
The Script has a simple Menu build in so that you can connect to the services that you need. You’re prompted for your Office365 Credentials prior to being put into the menu. Once you’re done connecting to the services, you can quit the menu (via option 6/Q) and use PowerShell as normal.
The Script will not set your execution policy. It’s presumed that you have the correct execution policy setup already.
Screenshot of the Simple Menu:
The Script:
Write-Host "Please Type in your Office365 Global Admin Credentials"

$cred = Get-Credential
function Show-Menu
{
param (
[string]$Title = 'Which Microsoft Online Service would you like to connect to?'
)
cls
Write-Host "================ $Title ================"
Write-Host "1: Type '1' to connect to Exchange Online."
Write-Host "2: Type '2' to connect to the Office365 Admin Center"
Write-Host "3: Type '3' to connect to Sharepoint Online."
Write-Host "4: Type '4' to connect to the Security and Compliance Center."
Write-Host "5: Type '5' to connect to Skype for Business Online"
Write-Host "Q: Press 'Q' to quit, or when you have connected to all required services."
}
do
{
Show-Menu
$input = Read-Host "Please make a selection"
switch ($input)
{
'1' {
cls
$session1 = New-Pssession -ConfigurationName Microsoft.Exchange -ConnectionUri https://outlook.office365.com/powershell-liveid/ -Authentication Basic -AllowRedirection -Credential $cred
Import-PSSession $session1
} '2' {
cls
$session2 = Connect-MsolService -Credential $cred
$session2
} '3'
{
cls
$orgName= Read-Host "What is the tennant Name?"
$session3 = Connect-SPOService -Url https://$orgName-admin.sharepoint.com -Credential $cred
$session3
} '4'
{
cls
$session4 = New-PSSession -ConfigurationName Microsoft.Exchange -ConnectionUri https://ps.compliance.protection.outlook.com/powershell-liveid/ -Authentication Basic -AllowRedirection -Credential $cred
Import-PSSession $session4
} '5'
{
cls
$session5 = New-CsOnlineSession -Credential $cred
Import-PSSession $session5
} 'q' {
return
}
}
pause
}
until ($input -eq 'q')
Set-MsolUser command returns a ‘Unable to update parameter’ error
You may see something different but similar depending on which Parameter you are setting.
Error Image:
Set-MsolUser Error
Reason for the Error:
In my situation the reason for the error was due to the Office365 Domain having DirSync Enabled… (Thinking about it, I should have known better).
Solution:
The Solution to this problem would be to make the required changes to the local Active Directory opposed to Office365. This would then reflect in the Office365 environment upon the next Sync Cycle.
In my situation however, the domain I was using was for testing purposes and I had already removed the AD Sync Server. Therefore I used the below command to Disable DirSync:
Set-MsolDirSyncEnabled -EnableDirSync $false
Note: Obviously you won’t want to use this command if you’re still using DirSync or it will stop syncing…
Once the DirSync had been disabled my command ran successfully.
Powershell Cmdlets to remember for the Microsoft 70-346: Managing Office 365 Identities and Requirements Exam
I have recently completed the Microsoft 70-346 ‘Managing Office 365 Identities and Requirements’ Exam. The Exam focuses quite a bit around PowerShell. Below is a list of PowerShell cmdlets which may appear in the exam.
Connecting to Office 365 via PowerShell: Import-Module MSOnline $UserCredential = Get-CredentialConnect-MsolService -Credential $UserCredential
Return all the subscriptions that are in the Office 365 Tennant (Licence Type): Get-MsolSubscription
Returns a list of SKU’s that the company has in their Office 365 Tenant (Licence Count): Get-MsolAccountSku
Create a New Office 365 User and Assign a license: New-MsolUser -UserPrincipalName -DisplayName -FirstName -LastName -LicenseAssignment -UsageLocation
Note – The UsageLocation is required for assigning a license. A user can be created without a license and without the need for defining the UsageLocation
Disable undesirable services of a Licence Subscription for a new user (e.g. Sharepoint): $LicenceOptions = New-MsolLicenseOptions -AccountSkuId -DisabledPlans "SHAREPOINTENTERPRISE" New-MsolUser -UserPrincipalName -DisplayName -FirstName -LastName -LicenseAssignment -LicenseOptions $LO -UsageLocation
Set a license for a specific user: Set-MsolUserLicense -UserPrincipalName "[email protected]" -AddLicenses
(UsageLocation must be set)
Set the Usage Location for a specific Office 365 User:
Set-MsolUser -UserPrincipalName -UsageLocation
Get a list of Domain Names assigned to your Office 365 Tennant: Get-MsolDomain
Set a default Office 365 Domain Name: Set-MsolDomain -Name o365.davidatkin.com -IsDefault
Remove a Domain Name from your Office 365 Tennant: Remove-MsolDomain -DomainName o365.davidatkin.com -Force
Get the records required for Verifying a domain name in your Office 365 Tennant: Get-MsolDomainVerificationDNS -DomainName o365.davidatkin.com Get-MsolDomainVerificationDNS -DomainName o365.davidatkin.com -Mode DnstxtRecord Get-MsolDomainVerificationDNS -DomainName o365.davidatkin.com -Mode Dnsmxrecord)
Get Office 365 to check that the Verification DNS Records against a domain are correct: Confirm-MsolDomain -DomainName o365.davidatkin.com
Set the Office 365 Password Policy: Set-MsolPasswordPolicy -DomainName -NotificationDays <30> -ValidityPeriod <90>
Set a single users Office 365 account to Password Never Expires: Set-MsolUser -UserPrincipalName -PasswordNeverExpires $true
Disable the requirement for Strong Passwords for a single Office 365 User: Set-MsolUser -UserPrincipleName -StrongPasswordRequired $false
Get a list of all Office 365 Users without a license assigned to their account: Get-MsolUser -UnlicensedUsersOnly
Change an Office 365 Users User Principal Name (logon username): Set-MsolUserPrincipalName -ObjectID
Get all members of a specific Office 365 Role: $role = Get-MsolRole -RoleName "name" Get-MsolRoleMember -RoleObjectId $role.ObjectId
Get a list of Soft Deleted Users in the Office 365 Tenancy: Get-MsolUser -UserPrincipleName -ReturnDeletedUsers
Permanently delete a Soft Deleted User in the Office 365 Tenancy: Remove-MsolUser -UserPrincipleName -RemoveFromRecycleBin
Change a Domain authentication type to Single Sign On (SSO): Set-MsolDomainAuthentication
Azure Active Directory Rights Management (AADRM):
Connect to Azure Active Directory Rights Management (AADRM): Import-Module aadrm $UserCredential = Get-Credential Connect-AadrmService -Credential $UserCredential
Control User Onboarding for Azure Active Directory Rights Management: Set-AadrmOnboardingControlPolicy -SecurityGroupObjectID "ID"
Note: This must be a security group – Not a User
Enable only users with an Azure Active Directory Rights Management licence to protect documents: Set-aadrmOnboardingControlPolicy -UserRmsUserLicence $true -Scope All
Get a list of all AADRM Administrators: Get-AadrmRoleBasedAdministrator
Remove administrative rights to the Azure Rights Management service for the user via their email address: Remove-AadrmRoleBasedAdministrator -EmailAddress "[email protected]"
Enable the AADRM Super User Feature to allow users to encrypt and decrypt documents: Enable-AadrmSuperUserFeature
Disable the AADRM Super User Feature to allow users to encrypt and decrypt documents: Disable-AadrmSuperUserFeature
Grant an Office 365 User AADRM Super User rights by Email Address: Add-AadrmSuperUser -EmailAddress "[email protected]"
Grant an Office 365 Group AADRM Super User rights by Email Address: Add-AadrmSuperUserGroup -GroupEmailAddress [email protected]
Get a list of current AADRM Super User Users: Get-AadrmSuperUser
Show the current AADRM Super User Group: Get-AadrmSuperUserGroup
Remove the AADRM Super User Group: Clear-AadrmSuperUserGroup
As an Azure Active Directory Rights Management SuperUser, get the status of a file to see if it is protected by RMS: Get-RMSFileStatus -File ""
Import the RMS Protection Module into PowerShell (For AADRM Super Users): Import-Module RMSProtection
Protect/UnProtect a file as an AADRM Super User: Protect-RMSFile -File "" UnProtect-RMSFile -File ""
Get a list of current RMS Templates:
Get-RMSTemplate
Get a list of Office 365 Global Admins: $role = Get-MsolRole -RoleName "Company Administrator" Get-MsolRoleMember -RoleObjectID $role.ObjectId
Add/Remove an Office 365 User from a Role: Add-MsolRoleMember -RoleName Remove-MsolRoleMember -RoleName
Azure Active Directory Connect:
Get Configuration Settings about the Azure AD Scheduler: Get-ADSyncScheduler
Force an Immediate AD Sync Cycle: Start-ADSyncSyncCycle -Policy Full
Stop a current AD Sync Cycle Stop-ADSyncSyncCycle
Change the Azure AD Connect Sync Cycle interval: Set-ADSyncScheduler -CustomizedSyncCycleInterval
Check the status of an ongoing AD Connector Sync: Get-ADSyncConnectorRunStatus
ADFS:
Install ADFS On Windows Server 2012: Install-WindowsFeature -Name ADFS-Federation -IncludeManagementTools
Install an Additional Server into an existing ADFS Farm: Add-AdfsFarmNode -PrimaryComputerName -CertificateThumbprint -GroupServiceAccountIdentifier
Convert an existing Office 365 Managed Domain into a Federated Domain Name: Convert-MsolDomainToFederated -DomainName o365.davidatkin.com
Convert a Federated Domain back to a ‘Standard’ Office 365 Managed Domain: Convert-MsolDomainToStandard
Convert a Federated User back to an Office 365 Managed User Account: Convert-MsolFederatedUser
Specify the Primary Federation Server when installing an additional Server into an Existing Farm (Command to be run if not on the Primary Server): Set-MsolADFSContect -Computer
Set the ADFS Organization Information Properties by piping infromation from the New-AdfsOrganization command: $MyOrg = New-AdfsOrganization -DisplayName "Org Name" -OrganizationUrl "http://" Set-AdfsProperties -OrganizationInfo $MyOrg
Get existing ADFS Settings: Get-MsolDomainFederationSettings
Set a new SSL Certificate on Federation Servers: Set-AdfsCertificate -Thumbprint
Set a new SSL Certificate onto ADFS WAP Servers: Set-WebApplicationProxySslCertificate -Thumbprint
Set a new ADFS Communications Certificate: Set-AdfsCertificate -CertificateType Service-Communications -Thumbprint
Customise Web Links and wording on the ADFS Logon Web Page: Set-AdfsGlobalWebContent
Customise the Logo and Illustration on the ADFS Logon Web Page: Set-AdfsWebTheme
Create a new Theme for the ADFS Logon Web Page: New-AdfsWebTheme -TargetName "Name"
Set the Active Theme for the ADFS Logon Web Page: Set-AdfsWebConfig -ActiveThemeName
Enable Modern Authentication in Exchange Online: Set-OrganizationConfig -OAuth2ClientProfileEnabled $true
Verify the status of Modern Authentication in Exchange Online: Get-Organizationconfig | FT Name,*Oauth*
Enable Modern Authentication in Skype for Business Online: Set-CdOAuthConfiguration -ClientAdalAuthOveride Allowed
Verify the status of Modern Authentication in Skype for Business Online: Get-CdOAuthConfiguration | select *adal*
Change the Authentication of a Domain Name from Federated to Standard temporarily until ADFS can be repaired: Set-MsolDomainAuthentication -DomainName -Authentication
Add Owners Actions to the Exchange Online Mailbox Auditing: Set-Mailbox -AuditOwner
Disable / Enable the Office 365 Admin Audit log: Set-AdminAuditLogConfig
Get Exchange Online Stale Mailbox Reports (Mailboxes not being used): Get-StaleMailboxReport Get-StaleMailboxDetailReport
Get Exchange Online Usage Reports: Get-MailboxUsageReport Get-MailboxUsageDetailedReport
Carry out an Exchange Online Message Trace for the past 7-Days: Get-MessageTrace Get-MessageTraceDetail
Carry out a Message Trace for Items upto 90 Days Old: Start-HistoricalSearch Stop-HistoricalSearch
Show Historical Message Trace history for the past 10 Days: Get-HistoricalSearch
Thank you for reading. If there are any errors or you feel there should be some addition’s, please comment and I will look at them. You may also be interested in the ‘Powershell Commands to remember for the Microsoft 70-347 Exam’ Article here: http://davidatkin.com/powershell-commands-remember-microsoft-70-347-exam/
Powershell Cmdlets to remember for the Microsoft 70-347: Enabling Office 365 Services Exam
I am currently studying for the Microsoft 70-347: Enabling Office 365 Services exam. Below is a list of PowerShell commands and their purpose for reference. More commands will be added to the below as I learn them.
Also, some useful flashcards for the 70-347 exam can be found here: Flashcards – Cram.com
Exchange Online PowerShell Cmdlets:
How to check and enable OAuth2 in Exchange Online: Get-OrganizationConfig | Select *OAuth* Set-OrganizationConfig -OAuth2ClientProfileEnable $true
How to check and enable OAuth2 in Skype for Business Online: Get-CsOAuthConfiguration | select *adal* Set-CsOAuthConfiguration -ClientAdalAuthOverride Allowed
OAuth Notes:
– Because Skype for Business Online and Exchange Online are linked, its best to have the same OAuth configuration on both services
– The OAuth configuration for Sharepoint Online is enabled by default
Skype for Business Online PowerShell Cmdlets:
The Skype for Business Online PowerShell cmdlet for displaying all policies applied to a particular user: Get-CsOnlineUser sip@address | select *policy*
SharePoint Online PowerShell Cmdlets:
How to disable Sharepoint Online External user Sharing Globally: Set-SPOTenant -SharingCapability Disabled
How to disable Sharepoint Online External user Sharing per Site Collection: Set-SPOSite -identity 'https://sitecollectionurl' -SharingCapability Disabled
How do you remove an External Users access to SharePoint Online via PowerShell? Get-SPOExternalUser
$RemoveUser = Get-SPOExternalUser -Filter testuser
Remove-SPOExternalUser -UniqueIds @($RemoveUser.UniqueId)
Grant the Site Collection Administrator Role to a user: Set-SPOUser -Site -Login -IsSiteCollectionAdmin $true
Change the Primary Site Collection Administrator of a site: Set-SPOSite -Identity -Owner
Set the Server Resource Quota for a specific site collection: Set-SPOSite -Identity -ResourceQuota -ResourceQuotaWanrningLevel
set the Storage Quota limits on a Sharepoint Site Collection: Set-SPOSite -Identity -StorageQuota -StorageQuotaWarningLimit
Create a new Sharepoint Site Collection: New-SPOSite -Title Test1 -url https://testing.sharepoint.com/sites/Test1 -LocalID 2057 -Template "STS#0" -Owner [email protected] -StorageQuota 1024
*Note(s) on creating a new Site Collection ID*:
– LocalID is the Language ID – See here for a List> Microsoft Local ID Library
– StorageQuota is in MB
– Here is a Link to the different Sharepoint Online Template IDs> Sharepoint Template IDs
Get a list of Sharepoint Online Local ID’s and Templates: Get-SPOWebTemplate
Remove a Sharepoint online Site: Remove-SPOSite -Identity
Restore a delete Sharepoint Online Site: Restore-SPOSite -Identity
Security and Compliance:
Connect to the Office365 Security and Compliance Centre: $Cred = Get-Credential
$Session = New-PSSession -ConfigurationName Microsoft.Exchange -ConnectionUri https://ps.compliance.protection.outlook.com/powershell-liveid/ -Credential $Cred =Authentication Basic -AllowRedirection
Import-PSSession $Session
Create a new eDiscovery Compliance Case: New-ComplianceCase
Get information on a current eDiscovery Compliance Case: Get-ComplianceCase
Remove a current eDiscovery Compliance Case: Remove-ComplianceCase
Make changes to a current eDiscovery Compliance Case: Set-ComplianceCase